|
Please, do not read this document if you
use ATS Desktop Client on a stand alone PC.
Also, you do not need to
read this paper if you plain to use ATS Desktop with
Terminal Services
ONLY.
YOU MUST FOLLOW IT, if you use ATS Desktop with Terminal Services and
Active Directory.
-
Uninstall FIRST your current ATS Desktop
using the Windows
Control Panel.
-
Windows 2000/XP/2003: you need Administrator privileges
to
install this software.
-
This current version will work only in Windows 2000, XP and 2003. If you
install it on top of
Terminal Services, you must have Windows Terminal
Services correctly installed.
-
YOU MUST BE
ADMINISTRATOR user for the PC where ATS Desktop resides AND
you MUST
be the Domain Administrator.
-
The PC/Server
must be Active member of the domain.
-
The PC/Server
must be able to "see" all objects, members, users accounts
from
the Forest, Tree, Domain you want to use.
-
Your domain is on
top of a full Active Directory LDAP compatible.
1) Enter the Windows PC running Terminal Server,
connected with Active Directory, as
Administrator user 2) Run ATS Desktop Client
from the Windows menu "Start"->"Programs "->"ATS
Desktop 4" ->ATS Desktop 4
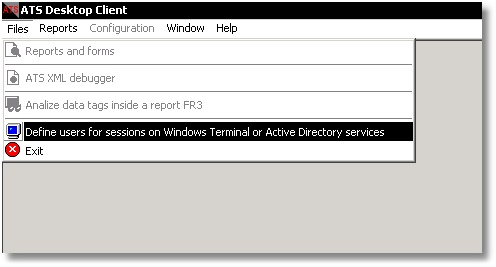
3) You will have the following
menu activated.
This will allow you to define
the users that will be using the ATS Desktop.
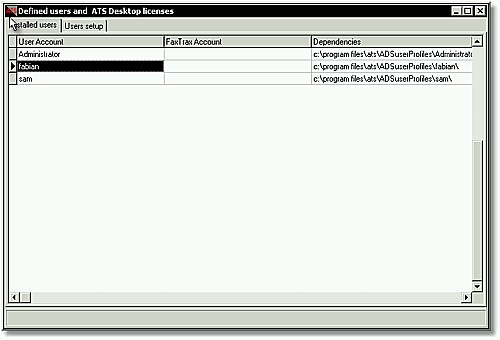
4) When selecting the above option the following screen will display

The above fields-columns contains the following information:
User Account (This field cannot be modified - it is only added by
clicking on "Users setup" tab.
FasTrax Account (This field can be updated and is for reference only - A way to identify the login used in the Linux server and
should be equal to the user logged on the the Active Directory).
Dependencies This field contains the folder location for the specified user - This field is important because it must correspond with the Desktop Folder in the User Setup within FasTrax. 5)
Add some users to ATS Desktop Client from Active Directory, by clicking on the "Users setup" tab. You
will see this screen.
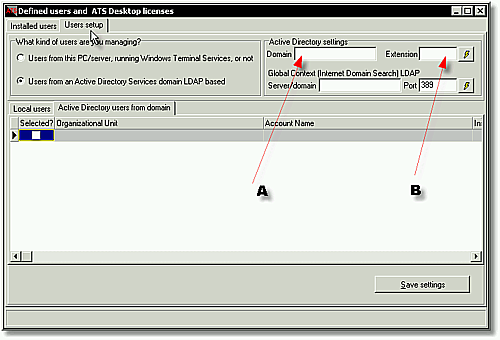
6) Look the edit box with the "Active Directory settings" caption,
here signaled with the arrows and the A and B letters.
A: is the place where you write your domain. For example:
mycompany
B: is the place where you write your domain. For example: com.
The system assume 'com' without '.'
or the " ' ".
For this example, we use a dummy domain pabloromero.com. We leave
the fields below the
legend "Global Context (Internet Domain
Search) LDAP" and "Port" untouched.
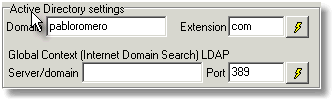
Once you write your Active Directory domain, click the  button.
 7) you will receive all your domain users on the grid
like this
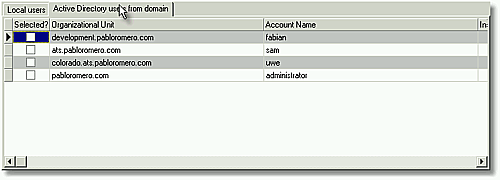
Now,
we will explain what this grid is showing:
The "Selected?" column is for you: clicking here you
select the user for installing.
This is the only column you can edit,
with your mouse.
The "Organizational Unit" details all organizational
unit of the domain the user belongs to.
After initial testing, in ATS we
find out this point is something to expand. Normally a well organized
Active Directory Service (ADS) tree has Organizational Units defined,
and users inside them.
In fact, ATS Desktop needs deal with users, not
groups. ADS tree shows up groups created by the
administrator, along
with the Active Directory groups (backup, domain administrators...) and
that view
would be confuse. Show the Organization Units is more rational
and effective.
The sintax is
"organizational.domain.extension".
The "Account Name" is the real account name assigned to
the user on the ADS tree.
The "Installed?" column is to indicate if the user was
installed. Managed by ATS Desktop.
The "User in domain" is the ADS account with sintax
"user@domain.extension".
The "Real name" column is the "real" and
human name for the user account on the ADS tree.
Normally this is the
Name and Last name.
The "Context" is an internal data from Active
Directory: this data "certifies" the account.
The "ADS Path" is the ADS user account expressed in
LDAP sintax. 8) Once you have all your ADS
users list on this grid, just move your mouse to the grid and just
do a
<Right Click> with your mouse. You will see this contextual
menu 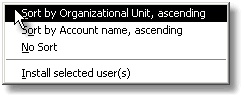 The
two first options are for the grid viewing. The
two first options are for the grid viewing.
You can view the users list
sorted by Organization Unit or sorted by the account name. It is
better view the grid by Organizational Unit, so you can install all or
some users from the (i.e.) "Fowarders" organizational unit,
then all or some users from the "Accounting" (i.e.)
organizational unit...you name it. "No sort" is self
explanatory.
Move the arrows keys, viewing
the users. Select the users you wish to install, by clicking on the
check box on the "Selected?" column.

When you have the users you wish to install, you must <Right
click>, choice the "Install selected user(s)" option.
9) The system will install the users you choose. At the status bar below
this windows you will be informed about the progression. You will be
informed about the sucess or about the problems with this process.
At the end, click on the  button. button.
10) We check our installed users clicking on the "Installed
users" tab. You must see something like
this.
Important:
* Try to manage the same users name on FasTrax as in the Active
Directory tree.
* Once those users are created, please take some time to write on
"FasTrax Account" column
the user name that those Windows
users uses for getting FasTrax access. It will help you for the
following step.
11) Indicating to the FasTrax users the dependencies from Windows
Terminal Server users.
This is a very important step.
On FasTrax, under the System Administration -> Menu Security Control -> Add/Update/Delete Users
you'll
enter the users name you want to update then go to the (A)dd Info screen
and update field 3.
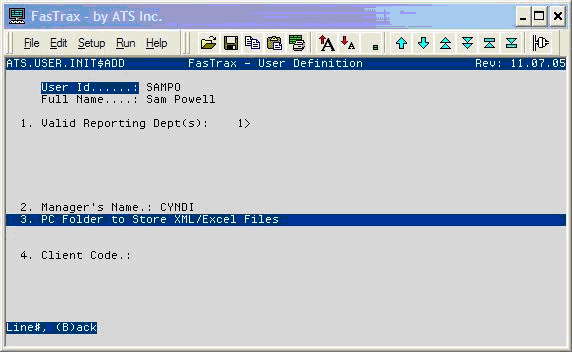
This has to match the exact same as it is defined in the fields Dependencies for that user.

This can easily be accomplished by highlighting the "Dependencies" column for that user and
pressing
<Enter>, then <Ctrl-C> (copy), then going to FasTrax
and doing
<Ctrl-V > (Paste).
This must be done for each and every
user: this is how FasTrax knows that where to place the XML's
and Excel
documents for that specified user.
|